

Alpine Linux - Install wireguard-go for OpenVZ 7 and wireguard on a KVM - IPv4 only

Alpine Linux - Install wireguard-go for OpenVZ 7 and wireguard on a KVM - IPv4 only
There are couple of providers offerings NAT vps such as inceptionhosting , mrvm and webhorizon .
Thanks to webhorizon for sponsoring this guide and offered to bump my ram.
NAT VPSs are affordable and useful for practical small apps. In this guide we will setup a docker swarm cluster with a mix of single KVM manager and couple of OpenVZ7 NATs workers. For high availability it is recommend to have an odd number < 5 managers.
Minimum requirements:
- 1 KVM and 1 NAT nodes with at least 512MB Ram and a minimum of 5GB disk
- using IPv4 on all nodes.
- The host OS is Alpine Linux version 3.15 which is latest at time of writing this guide. Webhorizon already provides alpine as an os template on their NAT range.
Section 1: ( Host setup and applications install )
Host kernel settings:
- All hosts should have those kernel settings on ; For NATs if not enabled then open a ticket and nicely ask.
# cat /proc/sys/net/ipv4/ip_forward
1
# cat /proc/sys/net/bridge/bridge-nf-call-iptables
1
for KVM you can add that by
cat > /etc/sysctl.d/01-configs.conf <<EOF
# alpine
net.ipv4.ip_forward=1
net.bridge.bridge-nf-call-iptables=1
EOF
If your NAT provider does not include Alpine Linux template then one can install it using this script and my slightly modified version script.
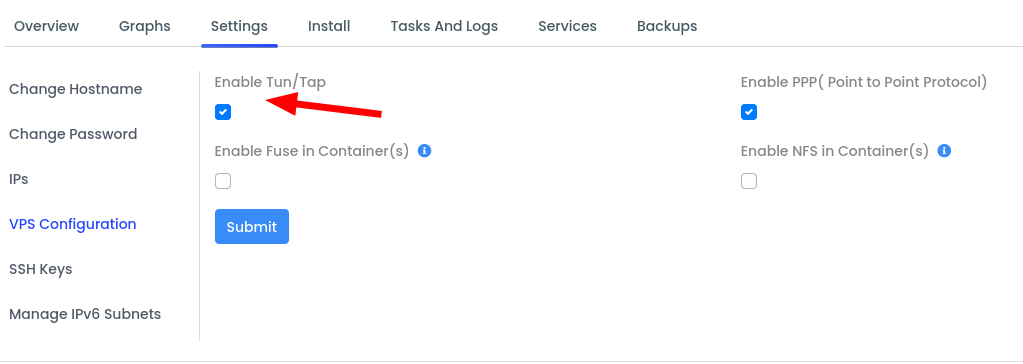
On your NAT vps cp make sure you enabled
OpenVZ7 Install wireguard-go
# apk add --no-cache --repository http://dl-cdn.alpinelinux.org/alpine/edge/testing wireguard-go
# apk add wireguard-tools
while the above is a testing repo so far it has been stable. You can always compile your own version.
KVM Install wireguard
# apk add wireguard-tools
Install and enable Docker
# apk add docker
# service enable docker
Section 2: Nodes details
Server "kvm"
- Main Interface IP = 185.253.47.54
- Wireguard Private IP = 192.168.1.2
Client "OpenVZ NAT"
- Main Interface IP = 10.37.136.225
- Wireguard Private IP = 192.168.1.10
Section 3: ( Generate keys and Conf file )
Wireguard requires key generation and setting up the network interface in a certain way. There are scripts and quick command lines to accomplish this task. The next details describe the manual method. Take a note of the cat outputs tp add in wg0.conf file.
generate keys those way on both nodes
# wg genkey | tee privatekey | wg pubkey > publickey
# cat publickey
     OaJ6KDPdgOs+aOJh7oEnaQYs/w9aIuHd0LfFgyx3ORw=
# cat privatekey
     WH8fN46zIMIXCxt2m5+I75vI+31oehh6aHte3qYYIys=
# # presharedkey is only needed for client node
#  wg genpsk > presharedkey
     Gg9HaCMkeEzUNl5zz9fUEzaDKIO2MNUKeG3D+ihchS8=
Server side config
# mkdir -p /etc/wireguard
# nano /etc/wireguard/wg0.conf
     [Interface]
     ListenPort = 51820
     PrivateKey = WH8fN46zIMIXCxt2m5+I75vI+31oehh6aHte3qYYIys=

     [Peer]
     PublicKey = OaJ6KDPdgOs+aOJh7oEnaQYs/w9aIuHd0LfFgyx3ORw=
     PresharedKey = Gg9HaCMkeEzUNl5zz9fUEzaDKIO2MNUKeG3D+ihchS8=
     AllowedIPs = 192.168.1.10/32
Client side config ; change port number to one in the range given to you, in my example ist 22520
# nano /etc/wireguard/wg0.conf
     [Interface]
     ListenPort = 22520
     PrivateKey = +KoN0pd30I6WERz2s9itHlIoikZBh1q2cbhB88UsnlI=

    [Peer]
    PublicKey = OaJ6KDPdgOs+aOJh7oEnaQYs/w9aIuHd0LfFgyx3ORw=
    PresharedKey = Gg9HaCMkeEzUNl5zz9fUEzaDKIO2MNUKeG3D+ihchS8=
    AllowedIPs = 0.0.0.0/0
    Endpoint = 185.253.47.54:51820
    PersistentKeepalive = 25
Section 4: ( Update network configuration )
Server side interface file
# nano /etc/network/interfaces
    ...
    auto wg0
    iface wg0 inet static
            address 192.168.1.2/24
            netmask 255.255.255.0
            pre-up ip link add dev wg0 type wireguard
            pre-up wg setconf wg0 /etc/wireguard/wg0.conf
            post-up ip route add 192.168.1.0/24 dev wg0; /sbin/iptables -A FORWARD -i wg0 -j ACCEPT;/sbin/iptables -A FORWARD -o wg0 -j ACCEPT;/sbin/iptables -t nat -A POSTROUTING -o eth0 -j MASQUERADE
            post-down ip link delete dev wg0
            post-down  /sbin/iptables -D FORWARD -i wg0 -j ACCEPT;/sbin/iptables -D FORWARD -o wg0 -j ACCEPT;/sbin/iptables -t nat -D POSTROUTING -o eth0 -j MASQUERADE
Client side interface file
# nano /etc/network/interfaces
    ...
    auto wg0
    iface wg0 inet static
        address 192.168.1.10/24
        pre-up /usr/bin/wireguard-go wg0
        post-up /usr/bin/wg setconf wg0 /etc/wireguard/wg0.conf
        post-up /sbin/ip route add 192.168.1.0/24 dev wg0;
        post-down /sbin/ip link del wg0
        post-down rm -f /var/run/wireguard/wg0.sock
Section 5: ( Reboot and Test )
Do a reboot and start testing the connection for both server and client, yours will be different when changing the ips, ports and keys etc...
# ip a


# wg show
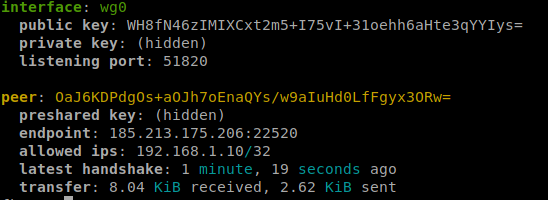
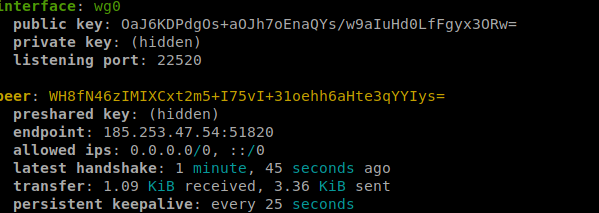
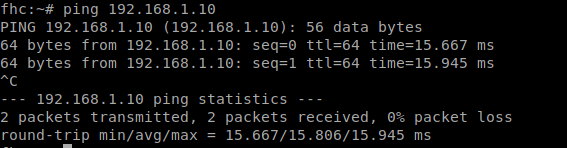
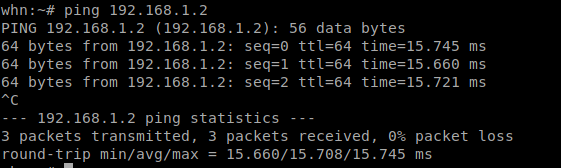
above test show connection is made and our wireguard nodes are reachable.
Comments
Thanks for the awesome write-up, @ehab!")
Head Janitor @ LES • About • Rules • Support
hahahahahahha @TheDP that was a funny surprise.
interesting set up, different from what i have as separate kvm vpses with wg.
I bench YABS 24/7/365 unless it's a leap year.
Thanks ehab for covering Alpine")
Thanks guys--- next article will be on docker swarm.
Good read! Thanks mate")
Ympker's VPN LTD Comparison, Uptime.is, Ympker's GitHub.
Well written post! aught up with it and nothing can top DP's response to this one.
Looking forward to the Docker Swarm post.
blog | exploring visually |
Does the client really need to use one of the mapped NAT ports?
Correct me if I'm wrong, but I thought that in such a setup only one open port on the server side is need, isn't it? The client could use a dynamic port, no?
In this case it shouldn't make any difference, but when connecting more than 2 machines it potentially would (direct peer2peer connection vs one hop over the server)
for traffic in both directions the mapped nat port is needed.
Shouldn't the client peer be then declared on the server side (as an endpoint) as well?
I don't know if this does help or not, but I have a setup with multiple peers with their endpoints declared (on each other peer) and I'd like to know what difference it makes (performance/throughput-wise probably none, but I'd guess in routing it does?)
Some time ago I setup my tunnels with this https://github.com/k4yt3x/wg-meshconf (or atleast I used to easier create configs) with multiple machines.
The mesh i haven't done before and will come next, so I will test and comeback later in 1-2 weeks time.
Slight necro, but...
If you use
PersistentKeepaliveon the NAT-ted side talking to a peer with a known endpoint IP, you don't really need the port to be mapped at all.do you mean this part
becomes
is it because using standard port?
No, I've not explained very well!
On the machine with fixed IP address:
On the machine with NAT:
You only really need the PersistentKeepalive on the NAT end. You can put it on both ends, but often then the one trying to connect to the NAT will remember a faulty mapping and doesn't always recover from a reassigned port.
i will test and ask to update this article.
thanks
Noice, thanks!
Will this work if the client is behind cgnat ?")
https://webhorizon.net